Raised bed gardening is a popular DIY project providing numerous advantages for novice and experienced gardeners. DIY raised bed gardening allows you to easily manage soil composition, improve drainage, and simplify pest control. In addition, elevated beds are more accessible and require less bending, making them a convenient option for those with limited mobility or back problems. Here is a step-by-step guide to how to DIY.
To get started with this DIY project, gather the necessary materials, such as untreated wood like cedar or redwood, screws, a level, a drill, and a shovel. Cedar and redwood are rot-resistant and safe for growing vegetables, while pressure-treated lumber is generally avoided due to potential chemical leaching into the soil. Combine organic matter like compost, topsoil, and peat moss to create the planting mix. This mixture will provide essential nutrients for the plants while promoting healthy drainage.
Once your materials are prepared, determine an ideal location with sufficient sun exposure and easy access for watering and maintenance tasks. Locate the raised bed strategically, allowing for at least six to eight hours of sunlight daily, and prepare the ground by removing any rocks, sticks, and thick grasses. Don’t forget to ensure proper drainage by adding a layer of mulch, newspaper, or cardboard to the base of the bed before filling it with the soil mix. After completing these preparatory steps, you can start planting and nurturing your garden.

DIY Raised Bed Gardening – Planning Ahead
Before starting your DIY raised bed project, choosing the right location in your garden is essential. Look for an area that receives ample sunlight throughout the day, as most plants need at least six hours of sun exposure daily. Also, ensure proper drainage to avoid waterlogged roots by selecting a slightly elevated spot or angling the bed to promote runoff.
When building a raised bed, consider using untreated hardwood or composite materials to prevent chemicals from leaching into the soil. Gather all necessary materials, including screws or brackets, a level, and other tools that may be required for this project.
Sketch out your raised bed design before building. The dimensions of your bed can vary depending on the plants you want to grow and the available space in your garden. A common guideline is to limit the width to 4 feet to easily reach the center of the bed without stepping on the soil. A depth of at least 12 inches promotes healthy root growth.
Once you have selected your design, make sure to properly measure and cut your materials, being as precise as possible. Assemble the bed using screws and brackets to ensure stability, and use a level to guarantee that all sides are even. Proper leveling will improve the bed’s overall appearance and promote optimal drainage.
After constructing your raised bed, fill it with a high-quality soil mix. To ensure a well-balanced environment for your plants, consider incorporating various organic materials such as compost, aged manure, or other soil amendments. Finally, plant your desired vegetables, herbs, or flowers and carefully monitor their development, providing them with the nutrients and water to thrive.
By following these guidelines, you will have the foundation for a healthy, productive DIY raised bed garden that you can enjoy and nurture for years.
Choosing Your Materials

When embarking on a DIY raised bed gardening project, selecting the right materials is essential. There are several materials to consider for building the frame of your raised garden bed, from wood to metal, and even some plastic options.
Cedar and redwood are popular wood materials due to their natural resistance to rot and pests. These materials are also pleasing, making them suitable for a visually appealing garden bed. Remember that cedar and redwood can be more expensive than other wood options, but they offer long-lasting durability.
Treated wood and pressure-treated lumber are also common choices for raised bed gardening, as they resist rot and insects. However, when using treated wood, make sure it has not been treated with harmful chemicals, such as creosote or ACQ (Alkaline Copper Quaternary), which can leach into the soil and harm your plants. Opt for woods treated with non-toxic agents to ensure a safe and healthy garden environment.
When using untreated wood, it’s essential to realize that it may not have the same longevity as treated options, but it ensures that no harmful chemicals are introduced into your garden. Some gardeners prefer untreated wood for this reason.
Railroad ties should be avoided, as they’re often treated with creosote or other harmful chemicals that can leach into your garden soil.
For fastening the wood pieces together, opt for deck screws or stainless steel screws. These types of screws are designed for outdoor use and provide increased resistance to rust and corrosion, ensuring your raised garden bed stays secure and stable over time.
In summary, when choosing materials for your raised garden bed, consider the materials’ durability, safety, and appearance. Cedar, redwood, pressure-treated lumber, and untreated wood are all viable options for your project, make sure to avoid any wood treated with harmful chemicals. And for fasteners, rely on deck screws or stainless steel screws for a sturdy and rust-resistant garden bed.
Building the Raised Bed
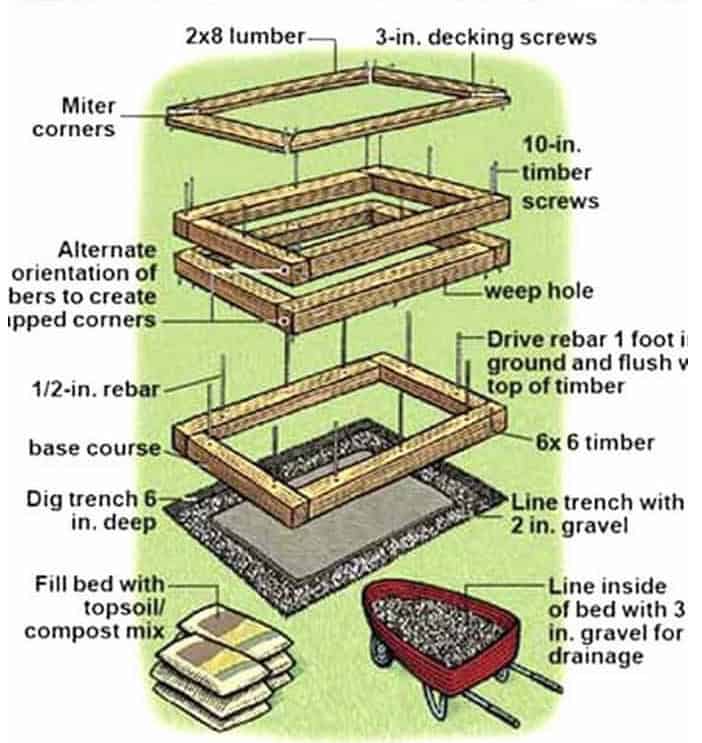
Building a raised garden bed is a rewarding DIY project that will enhance the aesthetics of your yard while making gardening more convenient. To start, gather the necessary tools: a level, drill, hand saw, rake, screws, and a helper for larger projects. Below are the steps to construct your raised bed.
First, prepare the site for your raised bed. Choose a location with optimal sunlight exposure and good drainage. Level the ground with a rake, ensuring that debris and grass are cleared away. Having a leveled area is essential for the proper growth of your plants.
Next, cut the wood for the frame of your raised bed. A hand saw or power saw can be used for this task. Determine the dimensions of the frame based on your preferred bed size and the available space in your yard. After cutting the wood, lay the pieces out to confirm their measurements and alignment.
Before assembling the frame, drill pilot holes where the screws will be inserted. This step will prevent the wood from splitting when securing it with screws. Ensure that the holes are correctly aligned on each piece of wood so the framework will be sturdy and square.
With the pilot holes in place, start assembling the frame. Utilize a drill and screws to attach the boards at each corner, creating a solid connection. A helper can be beneficial in holding the frame pieces steady while you drill and secure the connecting screws. Make sure to double-check that the frame remains level and square during this process.
Finally, place the assembled raised bed frame on the prepared site. Check once more that the frame is level and square on the ground. If necessary, use extra soil to make adjustments. Fill the bed with high-quality soil and start planting your vegetables, flowers, or any other desired plants.
For those interested in a more budget-friendly option, consider building a pallet-raised garden bed. Pallets can be easily repurposed to create a durable, simple raised bed solution.
Preparing the Bed
Before starting a DIY raised bed garden, the first step is to prepare the bed area. Begin by clearing the area of any weeds or grass. A proper weed-free base will help ensure the health of your plants. Next, lay down a layer of cardboard or newspaper over the ground. This layer will serve as a barrier, preventing weeds and grass from growing up into your raised bed while allowing water to drain through.
Once the barrier is laid down, gather a variety of organic materials to create a rich and diverse base for your raised bed. These materials can include compost, shredded leaves, grass clippings, sticks, and other organic matter. It’s helpful to use a wheelbarrow to transport the materials as you go. Layer the materials on top of the cardboard or newspaper, starting with thicker materials such as sticks or branches at the bottom, then building up to finer materials like compost, peat moss, and topsoil. This will create an optimal environment for plant roots to grow and thrive.
When filling the raised beds, selecting the right soil mix for your plants’ needs is essential. Different plants require different soil types, so finding a mixture that provides the necessary nutrients, drainage, and consistency is crucial. Keep in mind that incorporating organic matter like compost, peat moss, and other materials will help improve the soil structure, providing better water retention and drainage for the plants.
After the raised bed has been filled with soil and organic matter, it’s time to add a layer of mulch. Mulching around your plants helps to retain moisture, suppress weeds, and regulate soil temperature. Some popular mulching options include grass clippings, shredded leaves, or compost. Spread mulch evenly over the surface of the bed to help lock in moisture and protect your plants’ root systems.
With the bed prepared, your raised garden is ready for planting. By carefully selecting the right materials and designing your raised beds in a proper manner, you’ll create a thriving garden space for vegetables, flowers, or any other plants you wish to grow.
Choosing and Planting Your Plants

When planning your DIY raised bed garden, the first step is to select the appropriate plants for your garden. Consider the amount of sunlight your garden area receives, as most vegetables require at least six hours of direct sunlight each day. For gardens with more shade, choose shade-loving plants to ensure a thriving garden.
Start your vegetable gardening journey by selecting a variety of vegetables that you enjoy consuming. Popular choices include tomatoes, peppers, and leafy greens. You may also consider adding herbs to your garden, as they are easy to grow and can be used in various culinary dishes. For a comprehensive guide on growing herbs, consult the Ultimate Guide to Growing Herbs.
Once you have chosen your plants, it’s time to start the planting process. Begin by sowing your seeds according to the seed packet or plant label instructions. Different plants have varying sowing depths and spacing requirements, so be sure to follow these guidelines for optimal growth.
You can also purchase seedlings or young plants from your local nursery or garden center. Gently transplant these seedlings into your raised bed, planting them at the appropriate depth and spacing.
To help your plants thrive, provide them with the necessary nutrients, water, and growing conditions. Regularly check your plants for pests and diseases, and take appropriate action when needed. Most importantly, be patient and give your plants time to grow before expecting a harvest.
Consult Growing Guides from The Old Farmer’s Almanac for more information on planting and caring for specific plants in your raised bed garden. With proper care and maintenance, your DIY raised bed garden will flourish, providing you with homegrown vegetables and herbs to enjoy.
Maintaining Your Raised Bed
A well-maintained raised bed can lead to a thriving garden with fewer problems from weeds, pests, and critters. To properly care for your raised bed, make sure to water consistently, control weeds, protect your garden from common pests, and harvest your vegetables in a timely manner.
Proper watering is vital for healthy plants. Aim to keep the soil consistently moist but not soaking wet. Soaker hoses and drip irrigation are two effective methods to provide even watering to your plants. Keep an eye on weather conditions, and adjust your watering frequency accordingly.
Controlling weeds in your raised bed will help maintain a healthy environment for your plants. Mulching with straw, grass clippings, or wood chips can keep unwanted weeds at bay while retaining soil moisture. Regularly check for and remove weeds as they appear to prevent them from competing with your plants for nutrients and water.
Pests and critters can be a challenge for any gardener. Physical barriers like fencing or netting can help keep rabbits and other animals away from your plants. For insects and other pests, consider using organic or chemical solutions to control their population. Monitor your garden regularly for signs of infestations and address them promptly.
Properly timed harvesting is also essential to maintain the productivity of your raised bed. For example, harvesting onions at the right time should improve their storage life and taste. Furthermore, picking vegetables like tomatoes when they are ripe allows plants to continue producing more delicious fruits.
Following these maintenance tips for your raised bed garden, you’ll enjoy a successful growing season with healthy, beautiful plants and bountiful harvests.
DIY Raised Bed Gardening – Conclusion
Building a DIY raised garden bed is a rewarding and manageable project for gardeners looking to optimize their gardening space. Raised beds offer numerous benefits, such as improved soil quality, better pest control, and increased accessibility for those with limited mobility.
Constructing a raised bed typically involves gathering materials such as untreated lumber, screws, a saw, and a drill. The process consists of cutting the lumber into the desired lengths, assembling the frame into a box shape, and filling it with high-quality soil (source).
Raised beds are particularly suited for vegetable gardening, as they provide excellent drainage, aeration, and weed protection. This approach allows for higher yields with less effort, making them an ideal choice for beginners and experienced gardeners alike.
Following clear and straightforward step-by-step guides can make the process of building a raised garden bed smooth and enjoyable. With the right planning and execution, DIY raised bed projects can significantly enhance the overall gardening experience and contribute to a fruitful and efficient garden.
DIY Raised Bed Gardening FAQs
What materials are best for building raised garden beds?
The best materials for building raised garden beds are durable, rot-resistant, and safe for your plants. Treated lumber, cedar, and corrugated metal are some common choices. For a detailed list of materials required, refer to this DIY guide.
What is the ideal height for a DIY raised bed?
When building a raised bed, consider its purpose and the needs of the plants you intend to grow. Generally, 10 to 12 inches in height is adequate for most vegetables, but deeper beds are needed for plants with extensive root systems. Taller beds can also be beneficial for gardeners with limited mobility or who prefer not to stoop while working.
How do I plan the layout of a raised vegetable garden?
To plan the layout of your raised vegetable garden, consider factors such as sunlight exposure, available space, and your plants’ growth habits. Arrange beds in a way that ensures optimal sunlight exposure and allows for comfortable maneuvering between them. Consider using raised beds for plants like lettuce, which can benefit from their controlled growing environment.
How do you fill a raised garden bed with soil?
When filling a raised garden bed, it’s important to use high-quality soil that is well-draining and rich in organic matter. You can create your own soil mix by combining equal parts garden soil, compost, and coarse sand or perlite. For more information on selecting the right soil for your garden, refer to this article on soil types.
What should be placed at the bottom of a raised bed?
Before filling your raised bed with soil, it’s wise to lay down a barrier at the bottom. This can be accomplished using landscape fabric, cardboard, or a layer of gravel. A barrier prevents weeds from growing up in your garden while allowing water to drain properly. It is also helpful to discourage burrowing pests from entering your raised bed.
What are some creative ideas for the design of a raised garden bed?
There are countless ways to design a raised garden bed, from simple rectangles to more elaborate shapes and patterns. Some creative ideas include tiered beds for multi-level planting or incorporating built-in seating for a comfortable gardening experience. You can also explore herb spirals and keyhole gardens for a unique look. To learn more about herb gardening, refer to this guide on herb gardening for beginners.
